前回の四分木と空間分割の続きです。
目次
四分木による空間分割のプログラム(続き)
四分木クラスのメソッド
四分木クラスにメソッドを追加していきます。次の5つのメソッドを作ります。
①四分木に粒子を挿入するメソッド
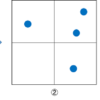
②ノードに粒子が含まれるかを判定するメソッド
③ノードを分割するメソッド
④粒子が所属するノードを見つけるメソッド
⑤四分木を走査するメソッド
四分木に粒子を挿入するメソッド
まず、四分木に粒子を挿入するメソッドinsertを作ります。
  insert(p) {
    if (!this.include(p)) {
      return;
    }

    if (this.sw === null)  {
      if (this.bucket.length < this.limit) {
        this.bucket.push(p);
        return;
      } else {
        this.divide();
      }
    }

    this.sw.insert(p);
    this.se.insert(p);
    this.nw.insert(p);
    this.ne.insert(p);
}引数pは粒子オブジェクトです。
まず、最初のif文、if (!this.include(p))でノードに粒子が含まれるかどうかを判定し、含まれない場合は何もせずにreturnしています。includeはノードに粒子が含まれるかの判定メソッドで、別途定義します。
次のif文ではthis.swがnull、つまり分割されているかどうかを判定しています。子ノードswがnullであれば分割されていない末端ノードを意味します。このとき、bucket配列の大きさがlimitより小さければ、bucketに粒子pを追加します。もし、limitを超えていれば、後で定義するdivideメソッドでノードを分割します。
最後に4つの子ノードにpを渡して再帰的に挿入操作を繰り返します。これで、末端のノードに粒子が格納されます。
※このプログラムでは隣り合う分割ノードのちょうど境界線上に粒子があると、どちらのノードにも粒子が格納されます。もし、どちらか一方のノードにのみ粒子を入れたい場合は、以下で説明するincludeメソッドの判定を変更するか、子ノードへの挿入部分に分岐を設けるなどの変更が必要です。
ノードに粒子が含まれるかを判定するメソッド
先程出てきたノードに粒子が含まれるかの判定メソッドincludeを定義します。
  include(p) {
    return (
      (this.region.left <= p.x && p.x <= this.region.right) &&
      (this.region.bottom <= p.y && p.y <= this.region.top)
    );
}粒子pのx座標とy座標がノードの領域に入っていたらtrueが返ります。
ノードを分割するメソッド
ノードを分割するメソッドdivideです。
  divide() {
    const x = this.region.left;
    const y = this.region.bottom;
    const width = 0.5 * this.region.width;
    const height = 0.5 * this.region.height;
    this.sw = new QuadTree(x, y, width, height, this.limit);
    this.se = new QuadTree(x + width, y, width, height, this.limit);
    this.nw = new QuadTree(x, y + height, width, height, this.limit);
    this.ne = new QuadTree(x + width, y + height, width, height, this.limit);

    for (let i = 0, n = this.bucket.length; i < n; i++) {
      const p = this.bucket[i];
      this.sw.insert(p);
      this.se.insert(p);
      this.nw.insert(p);
      this.ne.insert(p);
    }
    this.bucket = [];
}x、yはノードの左下角の座標を表し、width、heightはそれぞれ半分にして、新しくQuadTreeの四分木オブジェクトを子ノードに作成しています。
後半のfor文はノードに含まれる粒子に対するループで、各粒子を分割後の子ノードに振り分けています。振り分けたら、最後にbucketは空にしておきます。
粒子が所属するノードを見つけるメソッド
今回の問題ではマウスの位置のノードを見つける必要があります。そこで、ある位置のノードを返すメソッドfindを作ります。
  find(p) {
    if (!this.include(p)) {
      return null;
    }

    if (this.sw === null) {
      return this;
    }

    return (this.sw.find(p) ||
            this.se.find(p) ||
            this.nw.find(p) ||
            this.ne.find(p));
}引数pは粒子オブジェクトですが、ここではマウスカーソルの位置を表していると思ってください。
まず最初のif文でpが含まれなければnullを返すようにします。次のif文で末端ノードであれば、そのノードを返します。
最後に、子ノードがあれば再帰的にfindを繰り返します。ここで、各ノードのfindが||でつながれています。普通は、||はORを意味しますが、JavaScriptでは
a = 5 || null
の場合、aは5となります。つまり、pが含まれない子ノードからはnullが返ってきて、pが含まれる子ノードからはそのノードが返されるため、最終的にpが位置するノードが返されることになります。
四分木を走査するメソッド
最後に、四分木を走査して何かの処理をするメソッドtraverseを定義しておきます。
  traverse(func) {
    if (this.sw === null) {
      func(this);
    } else {
      this.sw.traverse(func);
      this.se.traverse(func);
      this.nw.traverse(func);
      this.ne.traverse(func);
    }
}ここでは処理は末端のノードでのみ行います。行う処理は引数funcとして関数で受け取ります。
if文は末端ノードかどうかの判定で、末端ノードならfuncにそのノードthisを渡して実行します。子ノードがあれば再帰的に走査していきます。
p5.jsのセットアップ
次にp5.js用にsetup関数を定義します。setup関数はp5.js内で最初に一度だけ呼ばれます。
function setup() {
  createCanvas(canvasWidth, canvasHeight);

  qtree = new QuadTree(0, 0, 1, 1, 5);

  randomSeed(1);
  p = new Array(2000);
  for (let i = 0, n = 2000; i < n; i++) {
    const r = 0.5 * random();
    const t = 2 * Math.PI * random();
    const x = r * Math.cos(t) + 0.5;
    const y = r * Math.sin(t) + 0.5;
    p[i] = new Particle(x, y);
    qtree.insert(p[i]);
  }
}createCanvasで描画領域を定義します。
次に、qtreeに四分木オブジェクトを作成します。ここで、ルートノードは座標(0,0)に縦横1×1の大きさの空間を作っています。またノードの粒子数制限は5個までとします。
randomSeed(1)はp5.jsの関数ですが乱数発生のシードを設定しています(これを指定しない場合、実行のたびに乱数の結果が変わります)。
粒子pは配列として2000個粒子オブジェクトを定義します。粒子の座標$(x,y)$は
$$ x = r \cos(\theta)+0.5$$
$$y = r \sin(\theta)+0.5$$
とし、$r$と$\theta$をrandom()を使って乱数で計算しています。こうすると空間の中央に集中した分布を持つ粒子配置になります。
そしてqtree.insertで先程作成した四分木オブジェクトに挿入しています。
p5.jsの描画
次にp5.jsで画面に描画を行う関数drawを作成します。
function draw() {
  const scale = 600;

  background(220);

  // particle
  noStroke();
  fill("blue");
  drawParticle(p, scale);

  // tree node
  stroke("black");
  noFill();
  qtree.traverse(function(node) {
    drawNode(node, scale);
  });

  // highlight particle on mouse
  const x = mouseX / scale;
  const y = (canvasHeight - mouseY) / scale;
  const pos = new Particle(x, y);
  const node = qtree.find(pos);
  if (node !== null) {
    stroke("red");
    drawNode(node, scale);

    noStroke();
    fill("red");
    drawParticle(node.bucket, scale)
  }
}draw関数の詳細は以前の粒子法の講座を参照してください。
drawParticleは粒子を描画する関数で後で説明します。
qtree.traverseの箇所は四分木の末端ノードの四角形を描画しています。drawNodeも後述します。
マウスカーソル位置のハイライト部分が最後にあります。マウスカーソルの位置は、p5.jsではmouseX、mouseYで画面ピクセルの座標として取得できます。これを元に空間座標(x,y)に変換しています。
空間座標でのマウス位置はposとして粒子オブジェクトを使って作成します。そしてqtree.find(pos)でその位置にある末端ノードを返しています。nodeがnullでなければ、赤色でそのノードとノードに含まれる粒子を描画してハイライト処理しています。
描画用の関数
最後に描画用の関数drawParticleとdrawNodeを説明します。
function drawParticle(p, scale) {
  for (let i = 0, n = p.length; i < n; i++) {
    const x = p[i].x * scale;
    const y = canvasHeight - p[i].y * scale;
    ellipse(x, y, 5);
  }
}

function drawNode(node, scale) {
  const x = node.region.left * scale;
  const y = canvasHeight - node.region.top * scale;
  const width = node.region.width * scale;
  const height = node.region.height * scale;
  rect(x, y, width, height);
}drawParticleは粒子を描画する関数で、粒子配列pと空間座標をキャンバスのピクセル座標に変換する係数scaleを引数に受け取ります。座標変換を行って、ellipse関数で円を描きます。
drawNodeはノードの四角形を描く関数で、同じく座標変換を行ってrect関数で四角形を表示します。
ellipseとrectはp5.jsの関数です。
全体のプログラム
ここまで説明したプログラム全体を載せておきます。
プログラムの実行
プログラムの実行も以前の通りでindex.htmlを作ってブラウザで開いて実行します。
<!DOCTYPE html>
<html>
  <head>
    <meta charset="utf-8">
    <title>Quad Tree</title>
  </head>

  <body>
    <script type="text/javascript" src="p5.min.js"></script>
    <script type="text/javascript" src="quad_tree.js"></script>
  </body>
</html>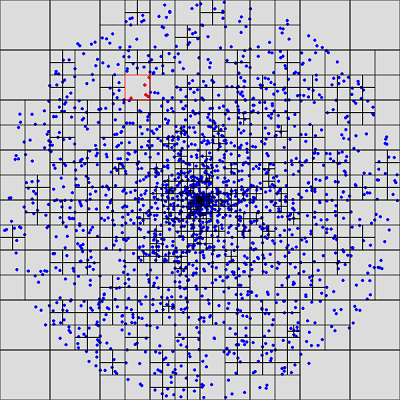
最後に
今回は四分木を使った空間分割について2回に分けて説明しました。このような空間分割法は実際様々な分野で使われています。
ここで説明した方法はオーソドックスな方法ですが、実際のアプリケーションではさらなる高速化が求められる場合があります。
例えばマウスが位置するノードを見つける箇所ですが、今回のプログラムでは四分木をルートノードからたどっています。これだとある程度の計算量が必要となります。そこで、指定した位置のノードをより少ない計算量で求めるアルゴリズム(例えば、Z階数曲線(Z-order curve))なども考えられています。ここでは詳しくは述べませんが、様々な改良を加えることにより、より高速に計算できるようになります。